Sweetwater – Nature’s Sports Drink!

Sweetwater is a great resource to find in the outdoors. Whether it’s for syrup, sugar, or just for drinking, Sweetwater is delicious! It has electrolytes, vitamins, minerals, inflammation-reducing agents, things to help control diabetes, liver-detoxifying properties, and cancer-fighting agents. I love to drink sweet water straight from the tree. Some people boil it to ensure the bad bacteria is gone. When it’s boiled, sweet water also loses the good bacteria stored in it.

Depending on what you want, you can tap different trees. The sweeter (higher sugar content) tree is the sugar maple, the most commonly heard for syrup. The other, birch trees, don’t have much sugar but are still sweet and have the same properties. I can personally say as a caffeine addict myself, sweet water has given me more energy than coffee or energy drinks ever have. Also, it has been used for a hangover cure!

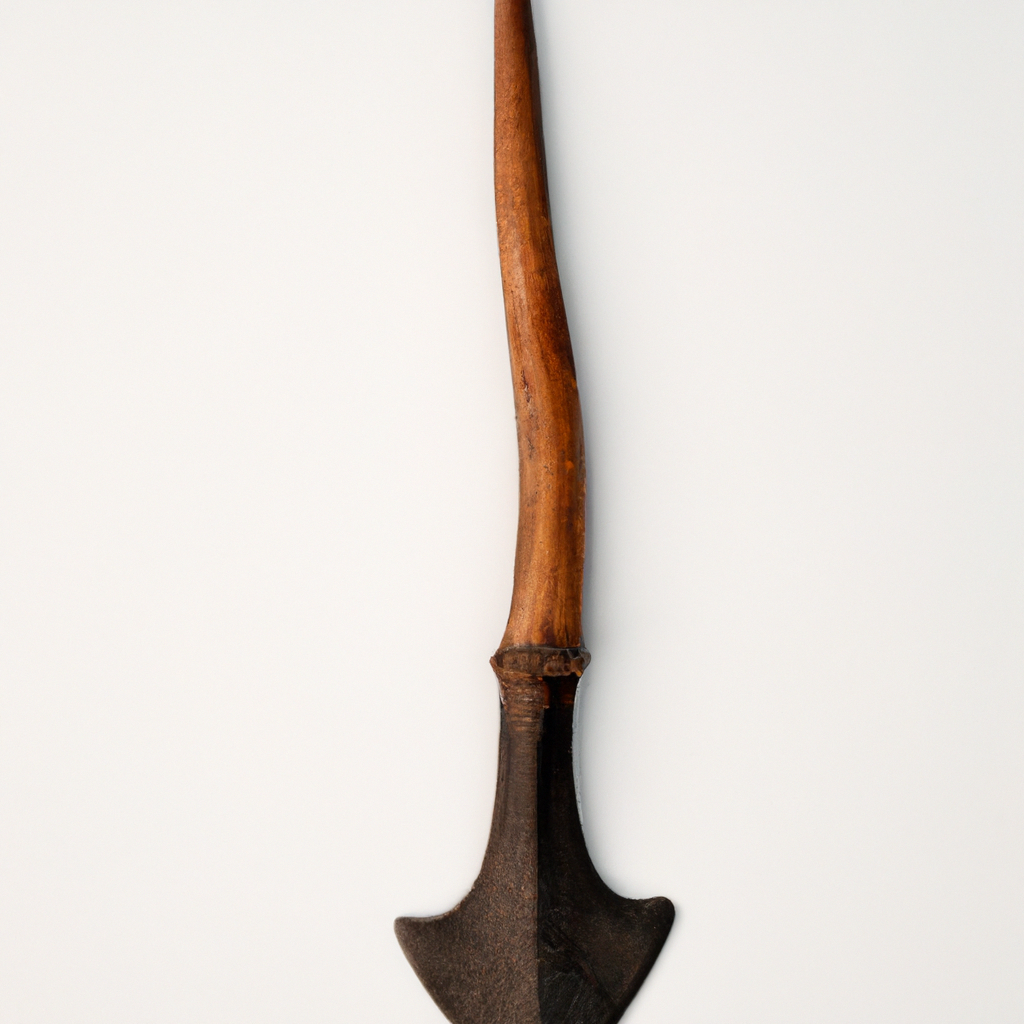
Instructions for Tapping

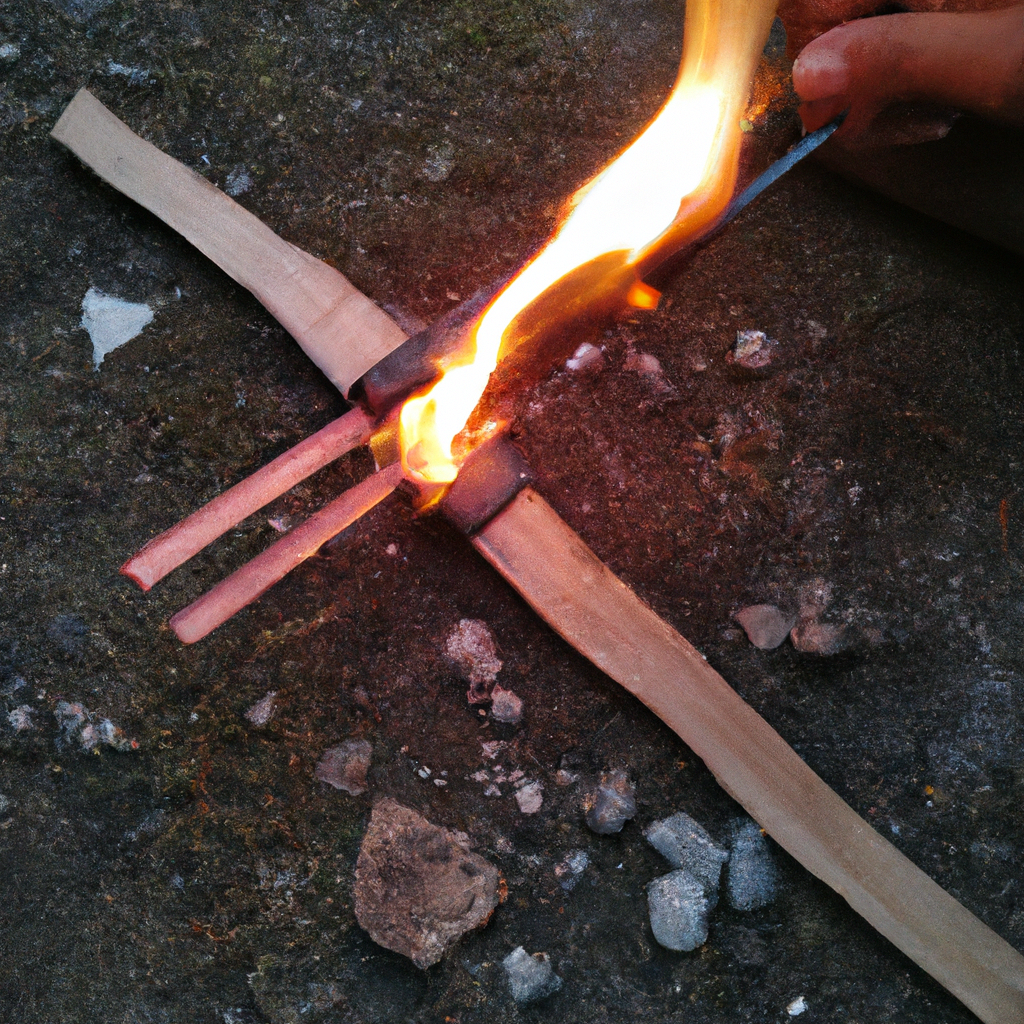
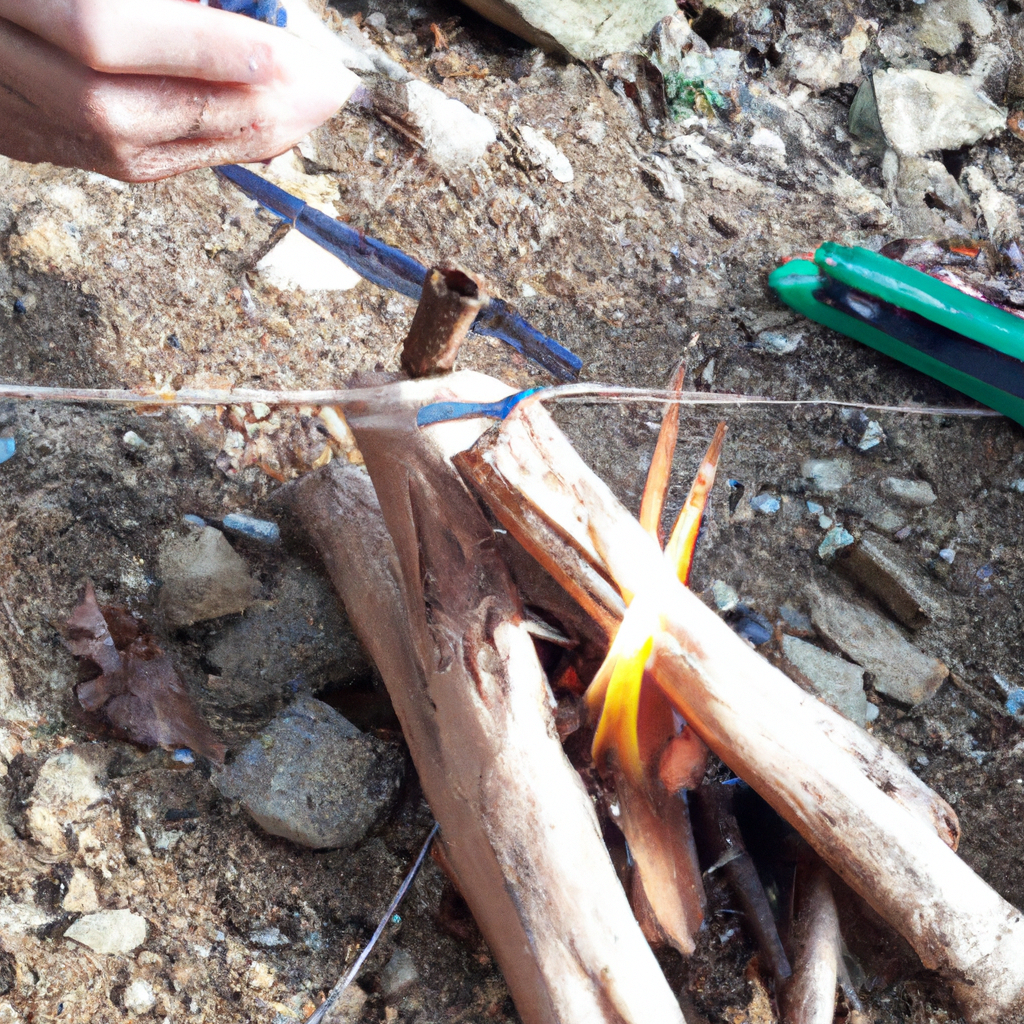
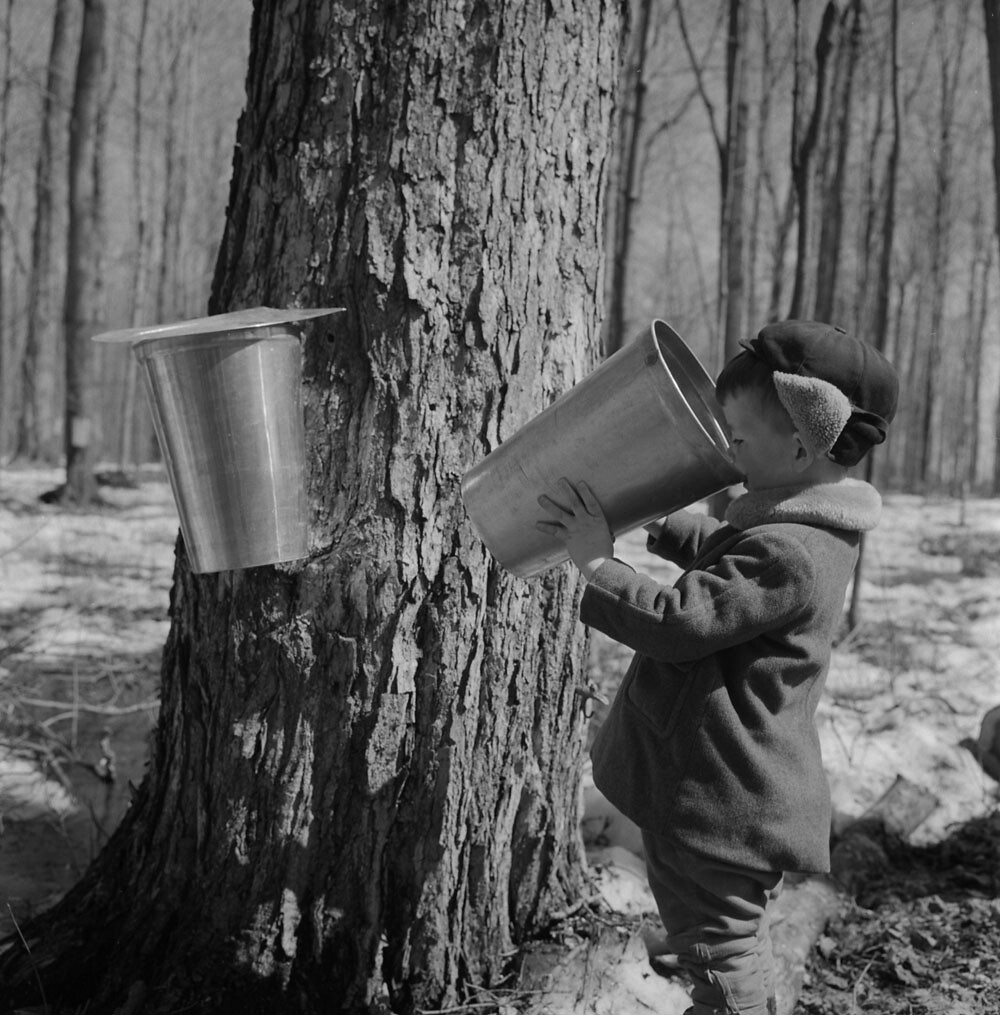
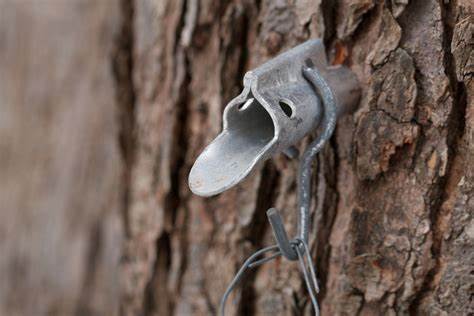
When you tap the tree, you must be careful not to cause a lot of harm. With drilling, you want your drill bit to be about the same width as the beginning of your tube, this can vary with the kind of tap that you get. With the different systems of sweet water, there are other tips and ways to tap. For drilling, if you are using a tube system, you want to go into the tree straight about 1 to 2 inches depending on the size of the tree. Then you stick your tap in the tree and use something soft like a rubber mallet to softly tap it in.

When you use a drip bag system you want to drill at an angle upwards. Same as the other, only about 1 to 2 inches. After you’re all finished, use some clay to fill the hole and let the tree heal.

Times to tap

The best times to tap are in early spring and fall. In the early spring, all the sweet water is heading up the tree to start making seeds and leaves. In the fall, all the leaves and seeds are grown, and the sap goes to be stored for the future. Before fall turns to winter, you still have time to collect some. The main issue with collecting the sweet water sap is that it starts to ferment quickly, it only stays for 2-3 days unrefrigerated and only about 6-7 days refrigerated, so you got to drink it quickly! Often, people use it for other things like mead, wine, syrup, or sugar. Primarily, people use birch sap for drinking because of its low sugar content. So, whether you’re looking for something healthy or just a tasty treat, sweet water has got you covered!

Below are the two systems you can use and what you need for both. Click below and start your sweet water journey!


Slice and Dice: Crafting a Wicked Woodsman’s Spear!

Woodsman's Spear

Get ready to chop some wood!

If you’ve ever dreamed of being a skilled woodsman, there’s no better way to start than by crafting your very own spear. Not only will it come in handy for numerous tasks, but it will also make you feel like a true adventurer. However, crafting a woodsman’s spear can be quite challenging, so it’s important to have a clear plan beforehand. In this article, we’ll guide you through the process of creating a wicked woodsman’s spear that will make all your friends jealous.

The ultimate guide to crafting a woodsman’s spear

Step 1: Find the perfect wood

The first step in crafting a woodsman’s spear is to find the right kind of wood. A good spear should be made from a sturdy and strong wood that can withstand heavy use. Look for woods like ash or hickory, which are both known for their strength and durability. Also, make sure the wood is straight and free from any knots or defects.

Step 2: Shape the spearhead

Next, you’ll need to shape the spearhead. This is the most important part of the spear, as it needs to be sharp and strong enough to cut through tough materials. Use a sharpening stone and a file to shape the spearhead into a sharp point, and then smooth out any rough edges. Be sure to wear protective gloves and eye gear to prevent injury during this process.

Step 3: Attach the spearhead

Once you’ve shaped the spearhead, it’s time to attach it to the wooden shaft. Drill a small hole through the center of the spear and then insert the spearhead, securing it with a strong adhesive like epoxy. Let the adhesive dry completely before handling the spear, and then reinforce the connection with twine or wire for added strength.

Congratulations! You’ve just crafted your very own woodsman’s spear. With your new tool, you’ll be able to chop through wood, clear brush, and even defend yourself against the elements. Remember to always use caution when handling sharp objects, and be sure to keep your spear away from children and pets. With a little practice, you’ll soon be a skilled woodsman, ready to tackle any challenge that comes your way.

Spark Your Adventure: Mastering Fire Steel for Forest Fires!

starting fire with fire steel

Are you an adventurer with a passion for the great outdoors? Do you love exploring the beauty of forests and nature trails? While the wilderness can be an exciting place to explore, it can also be dangerous if you are not prepared. One of the most essential skills for any forest adventurer is knowing how to start a fire. In this article, we will explore the art of fire steel for forest fires and how it can help you stay safe and adventurous in the great outdoors.

starting fire with fire steel

Ignite Your Inner Explorer: Learn Fire Steel for Forest Adventures!

Fire steel is a tool used to ignite fires in the wilderness. It may seem like a simple tool, but mastering the art of fire steel can take your forest adventures to the next level. Whether you are camping, hiking, or backpacking, knowing how to start a fire can keep you warm and safe in the wild. Fire steel is a reliable and versatile tool that can help you start a fire in any weather conditions, making it an essential skill for every adventurer.

Learning how to use fire steel is not difficult, but it does require practice. The first step is to choose high-quality fire steel and a suitable striker. The striker can be a knife, a piece of flint, or even a rock. Once you have your tools, it’s time to practice. Strike the fire steel with the striker, and you will see sparks fly. Aim the sparks at your tinder, such as dry leaves or bark, and blow gently to ignite a flame. With practice, you will become a pro at using fire steel, and you will be able to start a fire in any conditions.

starting fire with fire steel

Roam Free and Safe: Master the Art of Fire Steel for Forest Fires!

Starting a fire in the wilderness can be challenging, but with fire steel, it becomes a lot easier. Fire steel can be used to start a fire even in wet or windy conditions, making it an essential tool for any adventurer. The key to staying safe in the forest is to be prepared, and knowing how to start a fire can be a lifesaver in an emergency. By mastering the art of fire steel, you can roam free and safe in the great outdoors.

In conclusion, fire steel is a skill that every forest adventurer should learn. By knowing how to start a fire, you can stay warm, cook food, and signal for help in an emergency. Fire steel is a versatile tool that can be used in any weather condition, making it an essential part of any adventurer’s toolkit. So, ignite your inner explorer and master the art of fire steel for forest fires. With practice and patience, you can become a pro at starting fires and stay safe and adventurous in the great outdoors.

Go ahead and explore the beauty of nature with confidence, knowing that you have the skills to start a fire in any condition. Remember to always follow fire safety guidelines and regulations, and leave no trace of your fire when you’re done. With fire steel, you can ignite your inner explorer and enjoy the wonders of the forest safely and responsibly. Happy adventuring!

Woodland Slumber: Craft Your Own Comfy Bed!

wilderness bed

As the temperatures drop and the leaves turn orange and brown, there’s nothing quite as cozy as snuggling up in a warm, comfy bed. And what better way to embrace the beauty of fall than by crafting your very own woodland bed? With a few simple materials and some creative inspiration, you can create a slumber haven that will make you feel like you’re camping out in the forest, even if you’re just in your own backyard.

Snug as a Bug: How to Create a Woodland Bed

First things first, you’ll need to gather some materials. Start with a sturdy wooden frame, which will serve as the foundation for your bed. You can purchase one from a home improvement store, or if you’re feeling adventurous, try building one yourself using reclaimed wood. Next, add some cozy elements like fluffy pillows, soft blankets, and a plush mattress. For an extra touch of woodland charm, drape some fairy lights or leaf garlands around the frame.

Once you’ve assembled the basic structure of your bed, it’s time to get creative with the details. Consider adding some rustic elements like pine cones, acorns, and dried leaves to the décor. Or, try painting the frame in earthy tones like brown, green, or beige, to give it a natural, forest-inspired look. You can also experiment with different textures, from wooly blankets to fuzzy pillows, to create a bed that’s as cozy as it is charming.

Dreamland in Your Backyard: DIY Bedding Tips

Now that your bed is complete, it’s time to focus on the bedding. One easy way to create a woodland-inspired look is by using earthy hues like brown, green, and orange. You can also incorporate natural materials like cotton, linen, and wool, which will add texture and warmth to your bed. For an extra cozy touch, consider making your own quilt or duvet cover using fabrics with woodland motifs like trees, leaves, and animals.

Finally, don’t forget to add some finishing touches to complete the look. Consider adding a canopy made from gauzy fabric or netting, which will give your bed a dreamy, romantic feel. You can also add some decorative pillows with forest-inspired designs, like deer or pine trees, to tie the whole look together. With a little creativity and some DIY know-how, you can create a woodland bed that will make you feel like you’re sleeping under the stars, even on the chilliest of nights.

Creating your own woodland bed is a fun and creative way to embrace the beauty of fall, and create a cozy, inviting space in your backyard. Whether you’re gathering around the firepit with friends, or simply enjoying a quiet night under the stars, your woodland bed will be the perfect place to snuggle up and get cozy. So why not grab some supplies, roll up your sleeves, and start crafting your very own slumber haven today?

“Stay Hydrated and Dive into Nature’s Water Wonders with These Expert Water Hacks”

Water creek woods wilderness

There’s nothing quite like the beauty of nature and the thrill of exploring it firsthand. But when you’re out in the wilderness, you’ll need to be prepared to face its challenges head-on. One of the most critical elements for any outdoor adventure is water – without it, you won’t last long! In this article, we’ll explore some amazing water hacks that will help you quench your thirst and dive into nature’s water wonders, ensuring you have a safe and enjoyable adventure.

Quenching Your Thirst: Amazing Water Hacks for the Wilderness!

When you’re out in the wilderness, finding safe drinking water is crucial. Here are some amazing water hacks that will help you stay hydrated:

  • Boil and Filter – One of the easiest ways to purify water is to boil it for at least one minute. You can also use a water filter to remove impurities and bacteria. A portable water filter is an excellent investment for any hiker or camper that will last you for many trips.
  • Collect Rainwater – If it’s raining during your camping trip, collecting rainwater is a great way to get clean drinking water. Set up a tarp to channel water into a container, and then filter or boil it before drinking.
  • Solar Still – If you’re in a dry area, you can create a solar still to collect water from the soil. Dig a hole in the ground, add vegetation, urine, or saltwater, and place a container in the middle. Cover the hole with plastic, and wait for the condensation to collect in the container.

Dive into Nature’s Water Wonders: Expert Tips and Tricks for Your Next Adventure!

Water plays a significant role in any outdoor adventure, from swimming in a lake to kayaking down a river. Here are some expert tips and tricks to help you make the most of nature’s water wonders:

  • Hydrate Before You Go – Before you start your water-based activities, make sure you’re well-hydrated. Bring plenty of water with you, and drink it regularly throughout the day.
  • Choose the Right Gear – Depending on your activity, you’ll need the right gear to stay safe and comfortable. For example, a life jacket is essential for kayaking or rafting, while water shoes are ideal for hiking in wet conditions.
  • Be Respectful – Finally, when you’re enjoying nature’s water wonders, be respectful of the environment. Don’t litter, avoid using soap or shampoo in natural water sources, and follow Leave No Trace principles to help preserve these beautiful areas.

By following these water hacks, you can stay hydrated and enjoy everything that nature’s water wonders have to offer. Whether you’re hiking, camping, kayaking, or just relaxing by the lake, these tips and tricks will help you make the most of your outdoor adventure. So pack your gear, grab your water bottle, and get ready to explore the great outdoors!

HOW TO WATERPROOF YOUR OLD BOOTS

waterproof boots

This is a video on how to waterproof your boots. It’s really easy. Here is a list of cheap supplies you will need to waterproof your old boots.

Supply links from Amazon

  1. Paint Brush
  2. Bees Wax OR Paraffin Wax
  3. Petroleum Jelly
  4. Cedarwood Oil


eBay

  1. Paint Brush
  2. Bees Wax OR Paraffin Wax
  3. Petroleum Jelly
  4. Cedarwood Oil

Another thing that you can do that I did not bring out on the video is that you can heat your boots up in the oven before applying the mixture. This makes the mixture absorb even further into the material. You can repeat and polish several times to get a good watertight seal.